
Want to add an intelligent AI chatbot to your website but think it's too complicated or time-consuming? Think again. In this tutorial, you'll have a fully functional AI assistant live on your website in just 10 minutes - and you won't write a single line of code.
Whether you're running a WordPress blog, Shopify store, custom website, or anything in between, this guide works for you.
What You'll Achieve in 10 Minutes
By the end of this tutorial, you'll have:
- ✅ An AI chatbot that knows your entire website inside and out
- ✅ 24/7 automated customer support answering visitor questions
- ✅ A customized assistant that matches your brand
- ✅ A live chat widget embedded on your website
- ✅ Real-time conversation tracking and analytics
All without touching a single line of code.
What You'll Need
Before we start, make sure you have:
- Your website URL (that's it for SiteAssist setup!)
- Access to your website's code or admin panel (to paste a simple script)
- 5-10 minutes of uninterrupted time
No technical expertise, coding knowledge, or developer help required.
Why This Method Works for Any Website
Unlike complex chatbot solutions that require integrations, APIs, and developer resources, this approach uses a simple embed script that works with:
- WordPress (any theme)
- Shopify, WooCommerce, BigCommerce
- Wix, Squarespace, Webflow
- React, Next.js, Vue, or any JavaScript framework
- Static HTML websites
- Custom CMS platforms
If you can paste a script into your website (like Google Analytics), you can add this chatbot.
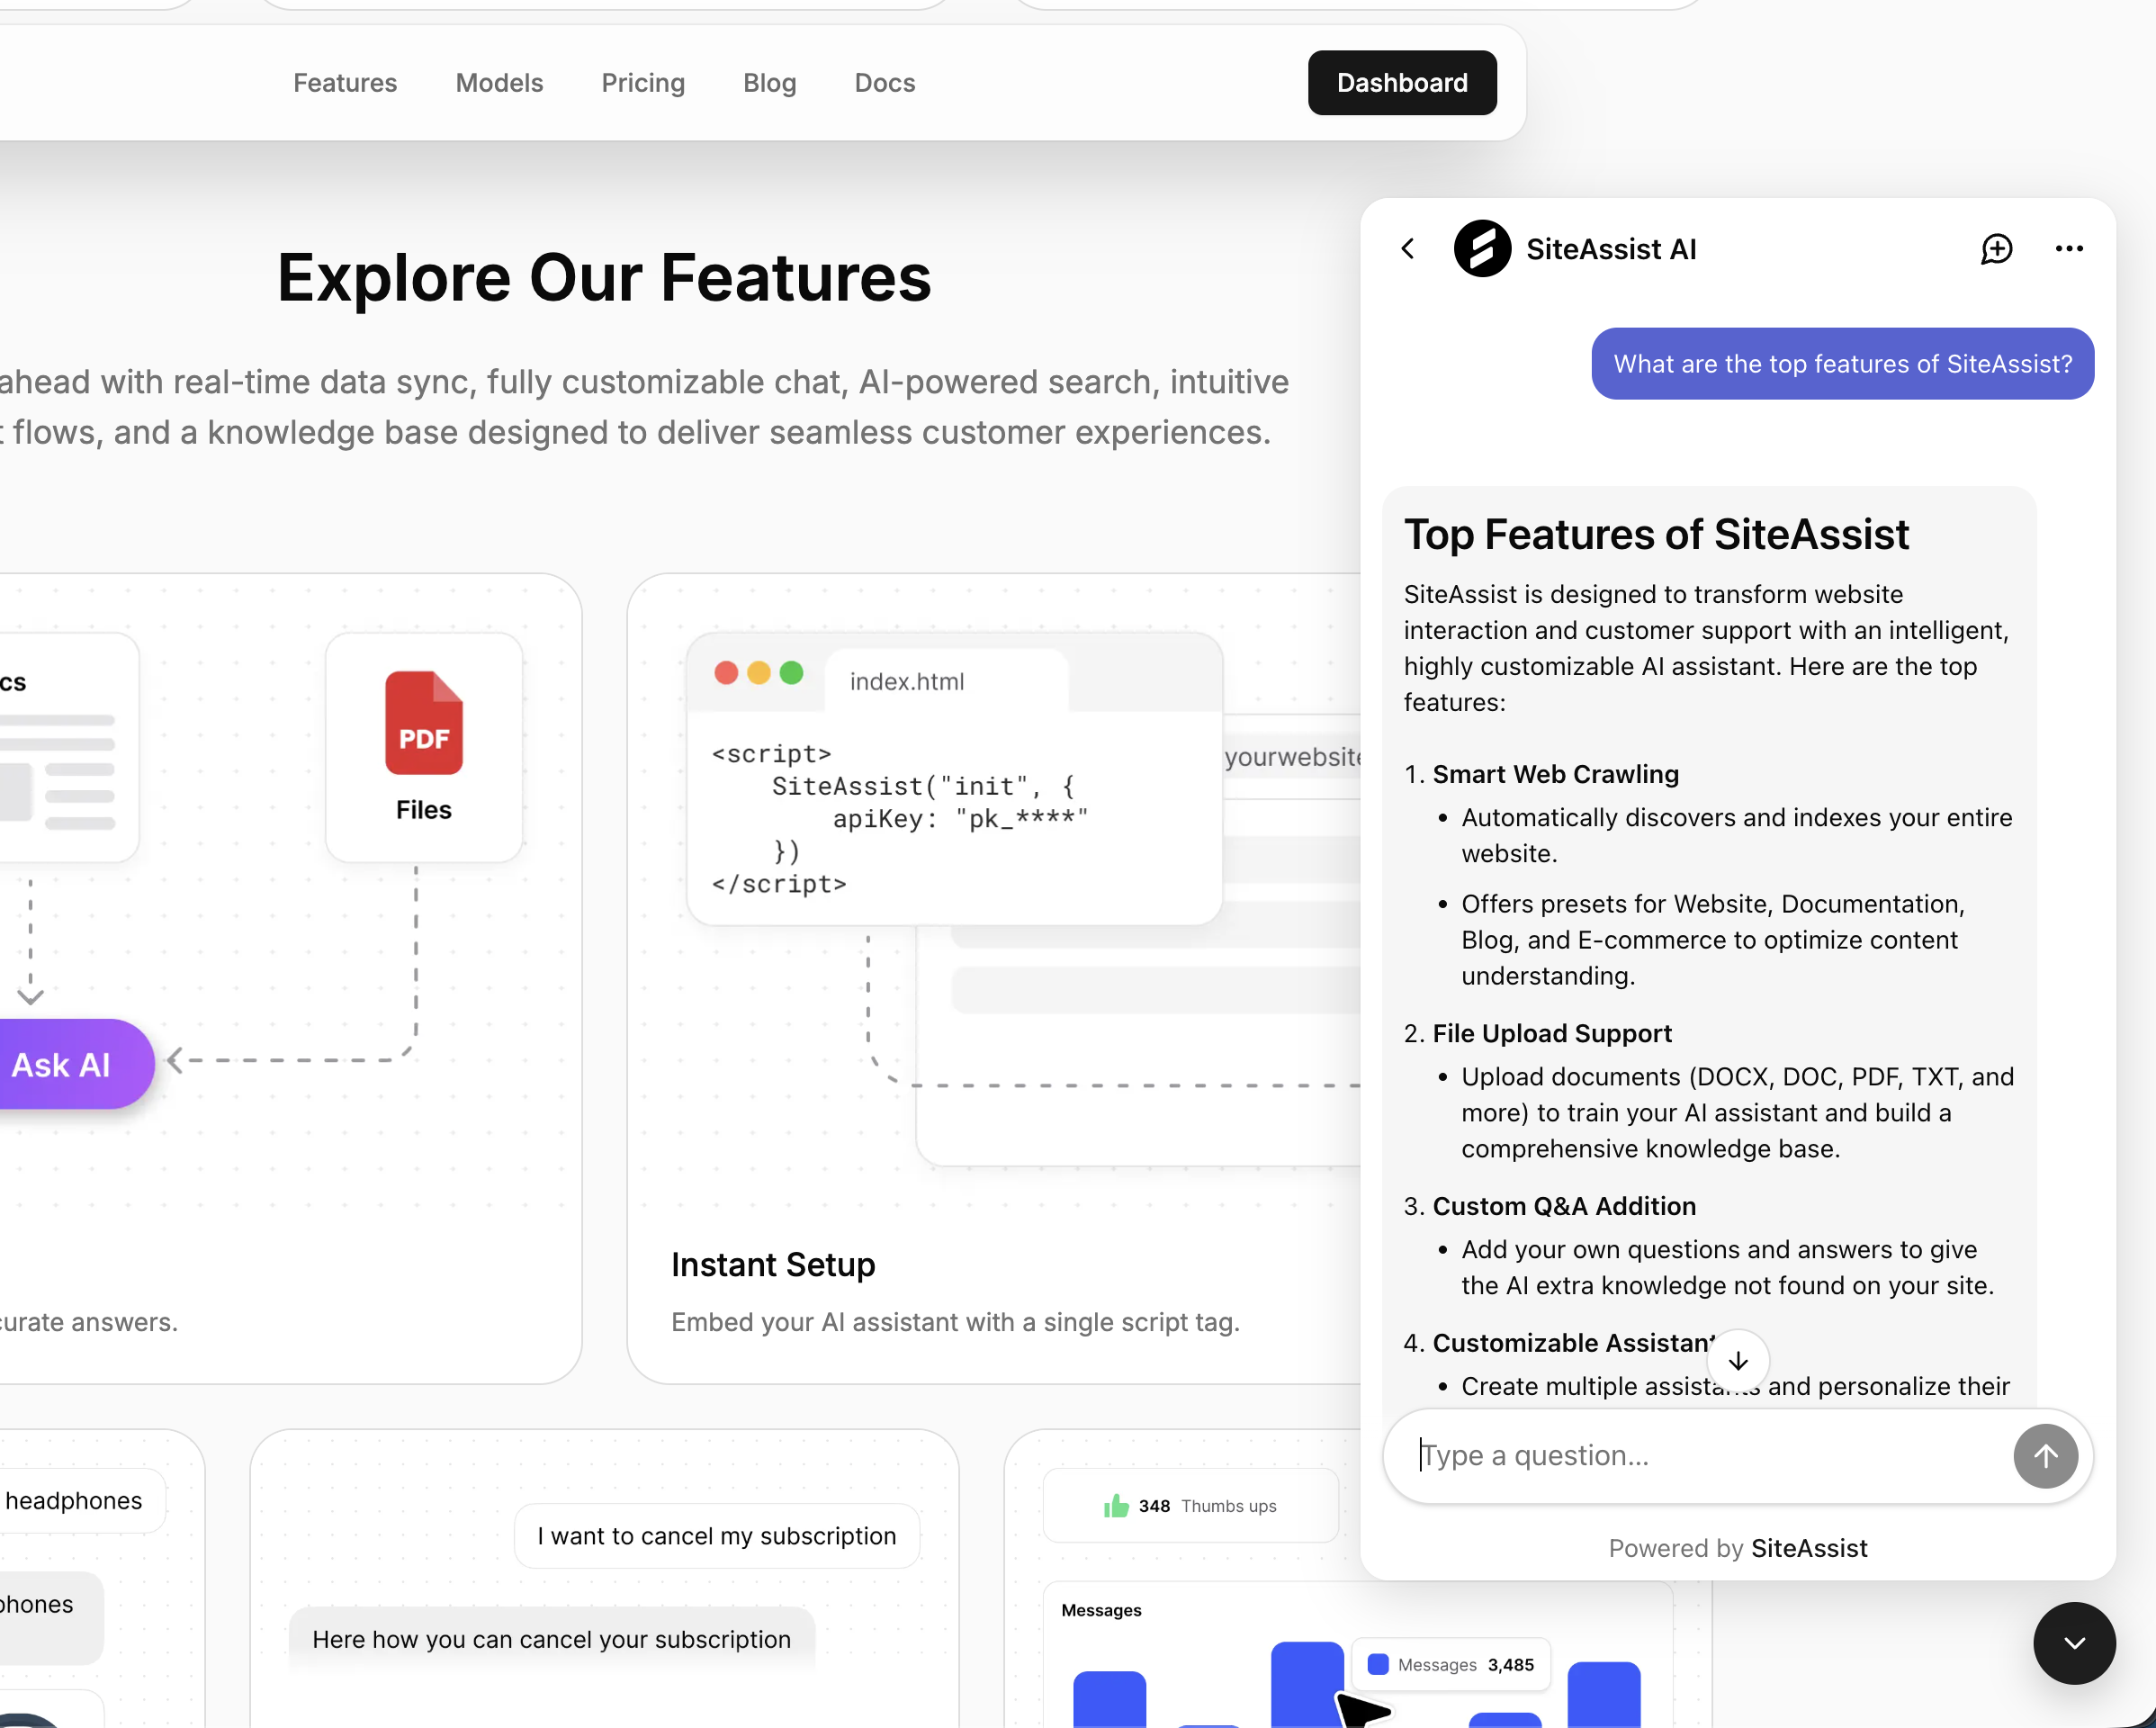 This is what your AI chatbot will look like on your website
Step 1: Create Your Free SiteAssist Account (2 minutes)
First, you'll need a SiteAssist account. Don't worry - the free plan includes everything you need to get started, and there's no credit card required.
- Go to siteassist.io/register
- Sign up with your email or use Google sign-in
- Verify your email address (check your inbox)
- Complete the quick onboarding flow:
- Create your workspace (name it after your company)
- Create your first project (name it after your website)
That's it! You now have a SiteAssist account and your first project is ready to go.
Free Plan Includes:
- 1 project (perfect for one website)
- 200 AI messages per month
- Up to 30 pages of website content
- Full customization options
Need more? You can always upgrade later or start with a 30-day free trial of any paid plan.
Step 2: Set Up Your Website Crawler (3 minutes)
Now comes the magic. Instead of manually teaching your chatbot about your business, SiteAssist's smart crawler automatically reads your entire website and trains the AI on your content.
Create Your Crawler
- From your project dashboard, click "Web Crawlers" in the sidebar
- Click the "Add Crawler" button
- Fill in the crawler details:
Name: Give it a descriptive name like "Main Website" or "Company Site"
Start URL: Enter your website's homepage URL
https://yourwebsite.comPreset: Choose the type that best matches your site:
- Website - General business websites, portfolios, company sites
- Documentation - Help docs, technical guides, API documentation
- Blog - News sites, blogs, article-focused content
- E-commerce - Online stores (coming soon!)
-
(Optional) Click "Advanced Settings" if you want to:
- Exclude specific pages (e.g.,
/admin,/checkout) - Set a maximum page limit
- Configure crawl depth
- Exclude specific pages (e.g.,
-
Click "Create & Start Indexing"
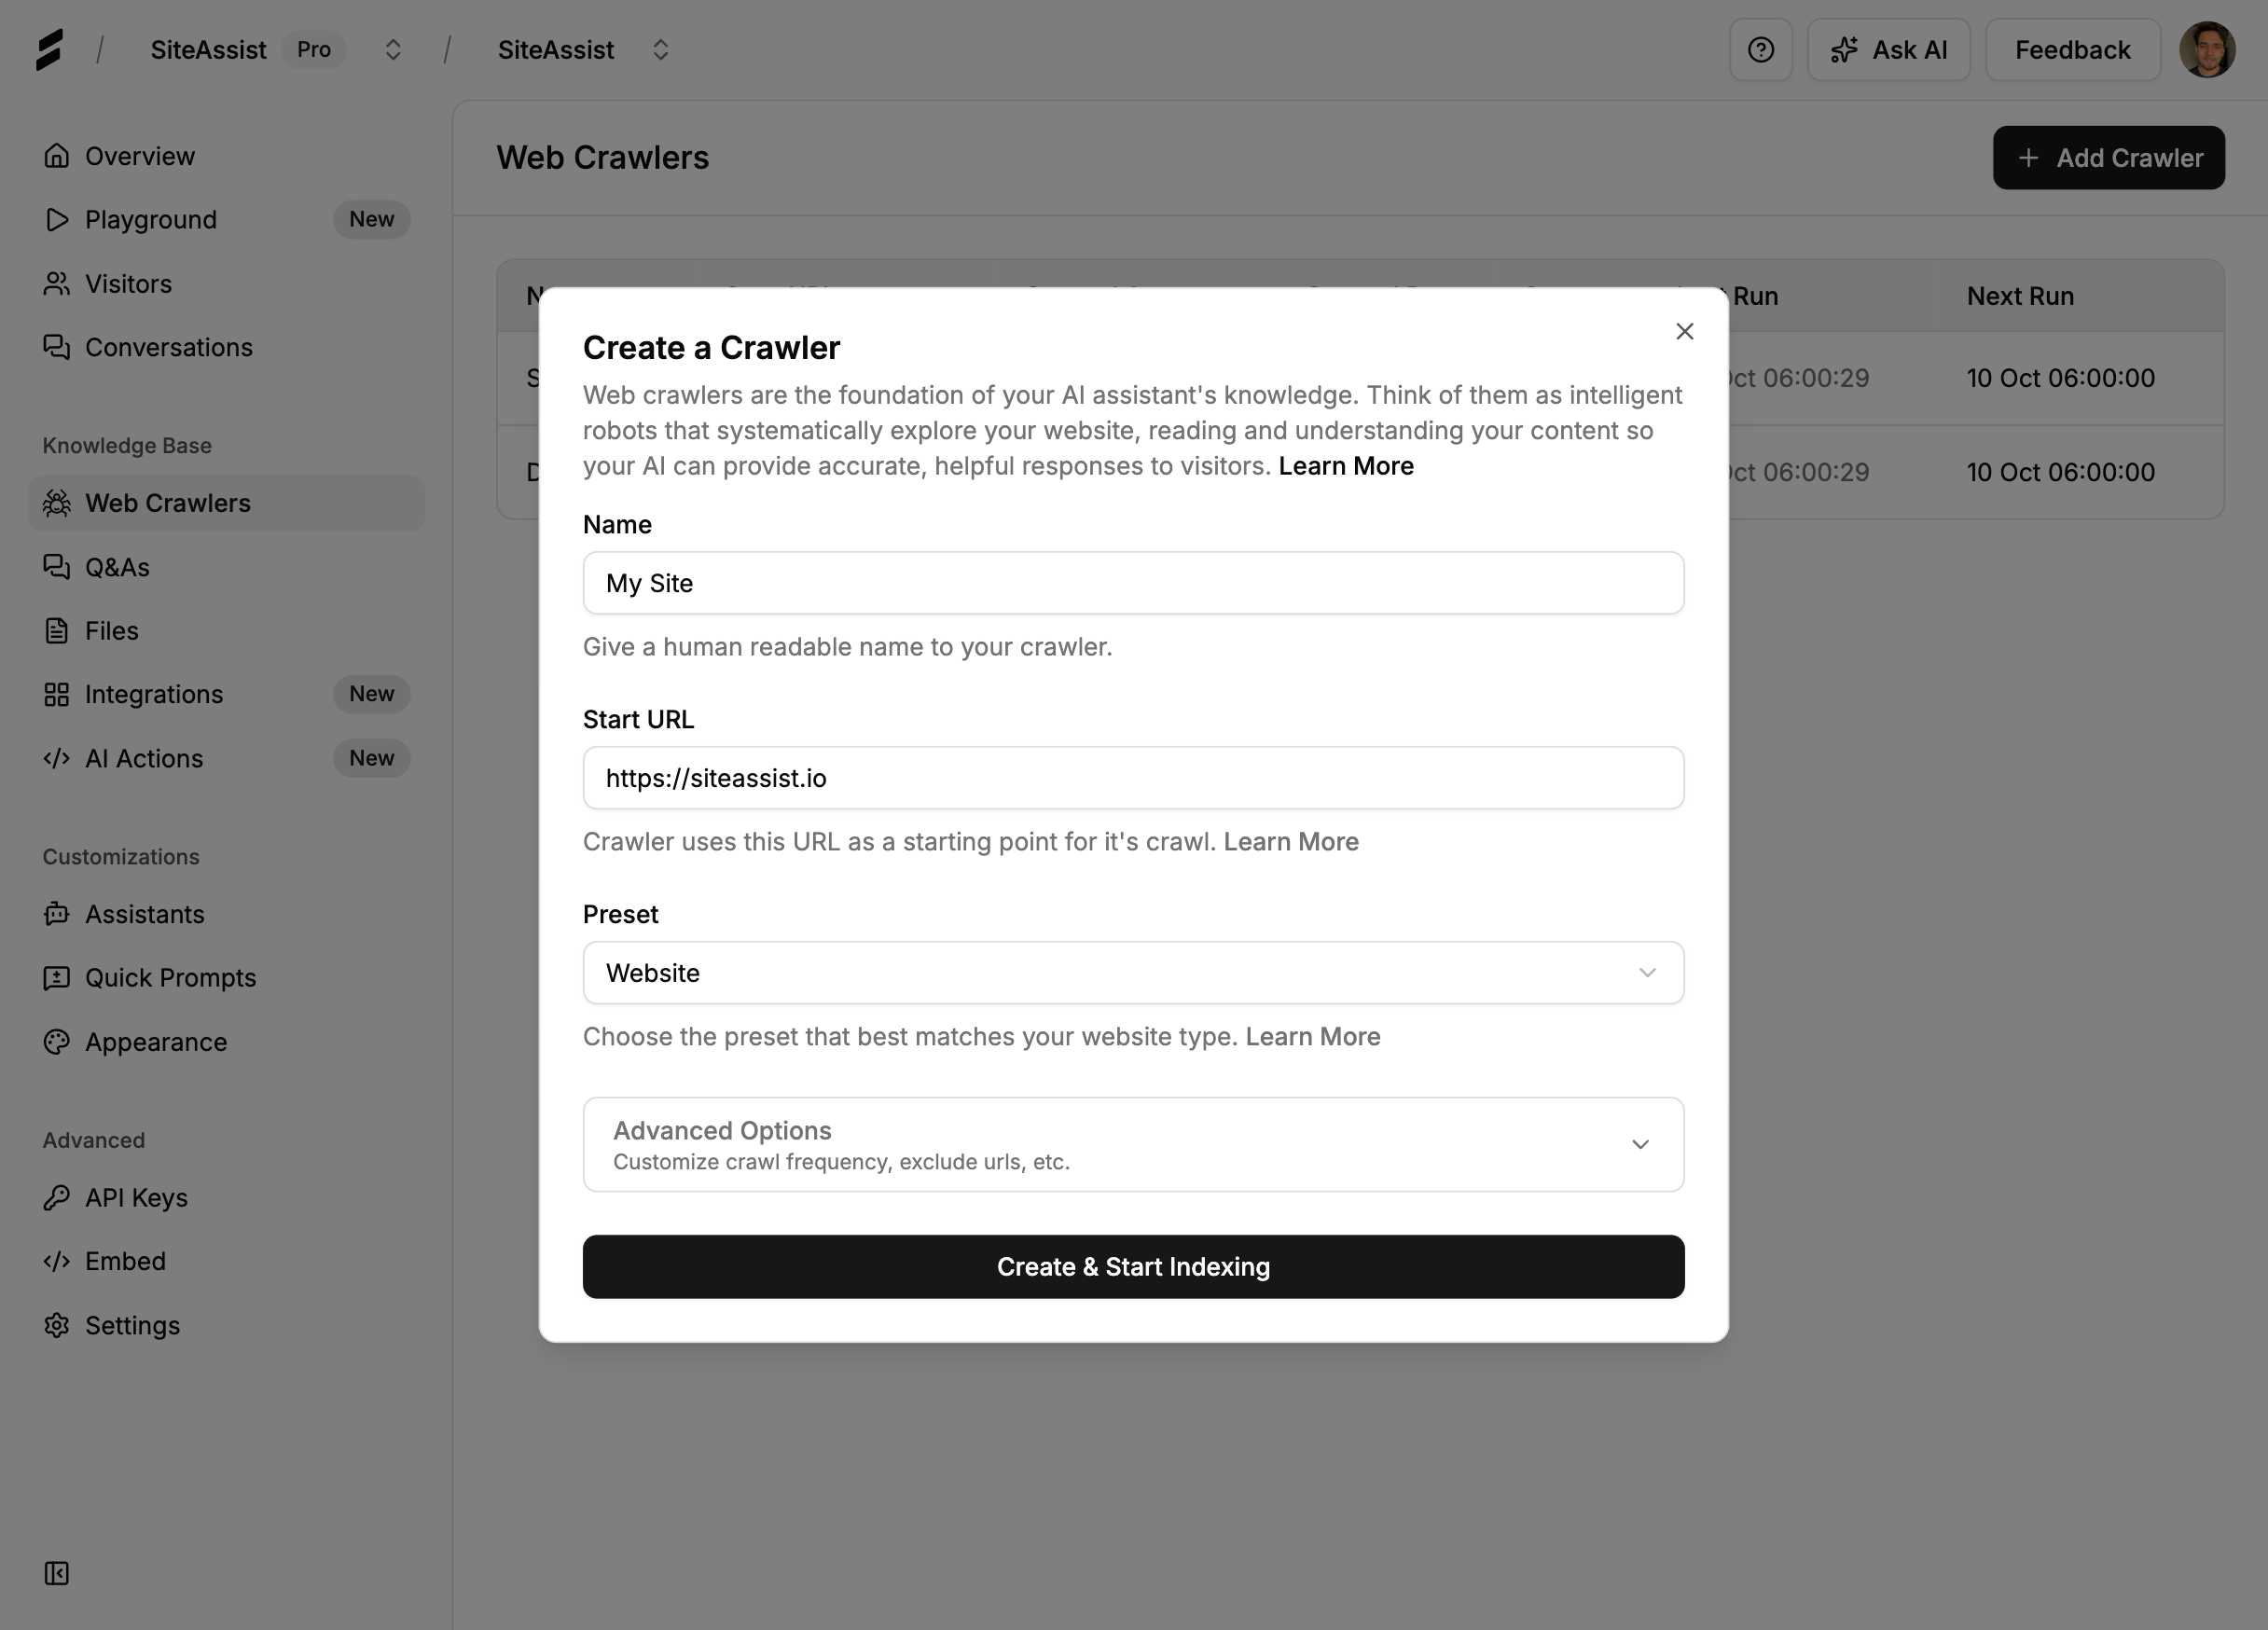 The crawler setup interface - just enter your URL and hit go
What Happens Next?
Your crawler immediately starts working:
- 🕷️ Discovers all pages on your website
- 📖 Reads and understands your content
- 🧠 Trains the AI on your products, services, and information
- ⚡ Usually completes in 2-5 minutes (depending on site size)
You'll see a progress bar and real-time logs showing which pages are being crawled. Don't worry - the crawler only reads your public content and doesn't affect your website's performance.
Pro Tip: If you have a large website (100+ pages), the crawler might take a bit longer. You can move to the next step while it works in the background!
Step 3: Customize Your AI Assistant (2 minutes)
While your crawler is working (or after it finishes), let's personalize your AI assistant to match your brand.
Navigate to Assistant Settings
- Click "Assistants" in the sidebar
- Click on your default assistant (usually named "Default Assistant")
- You'll see multiple customization tabs
Basic Information
Display Name: What your chatbot introduces itself as
Example: "Alex from Acme Support"Welcome Message: The first thing visitors see
Example: "👋 Hi! I'm here to help you find what you need. Ask me anything about our products or services!"System Prompt: How your assistant behaves (this is powerful!)
Example: "You are a friendly customer support assistant for Acme Corp.
Be helpful, concise, and professional. Always try to guide users to
relevant products or services. If you don't know something,
politely say so and offer to connect them with our team."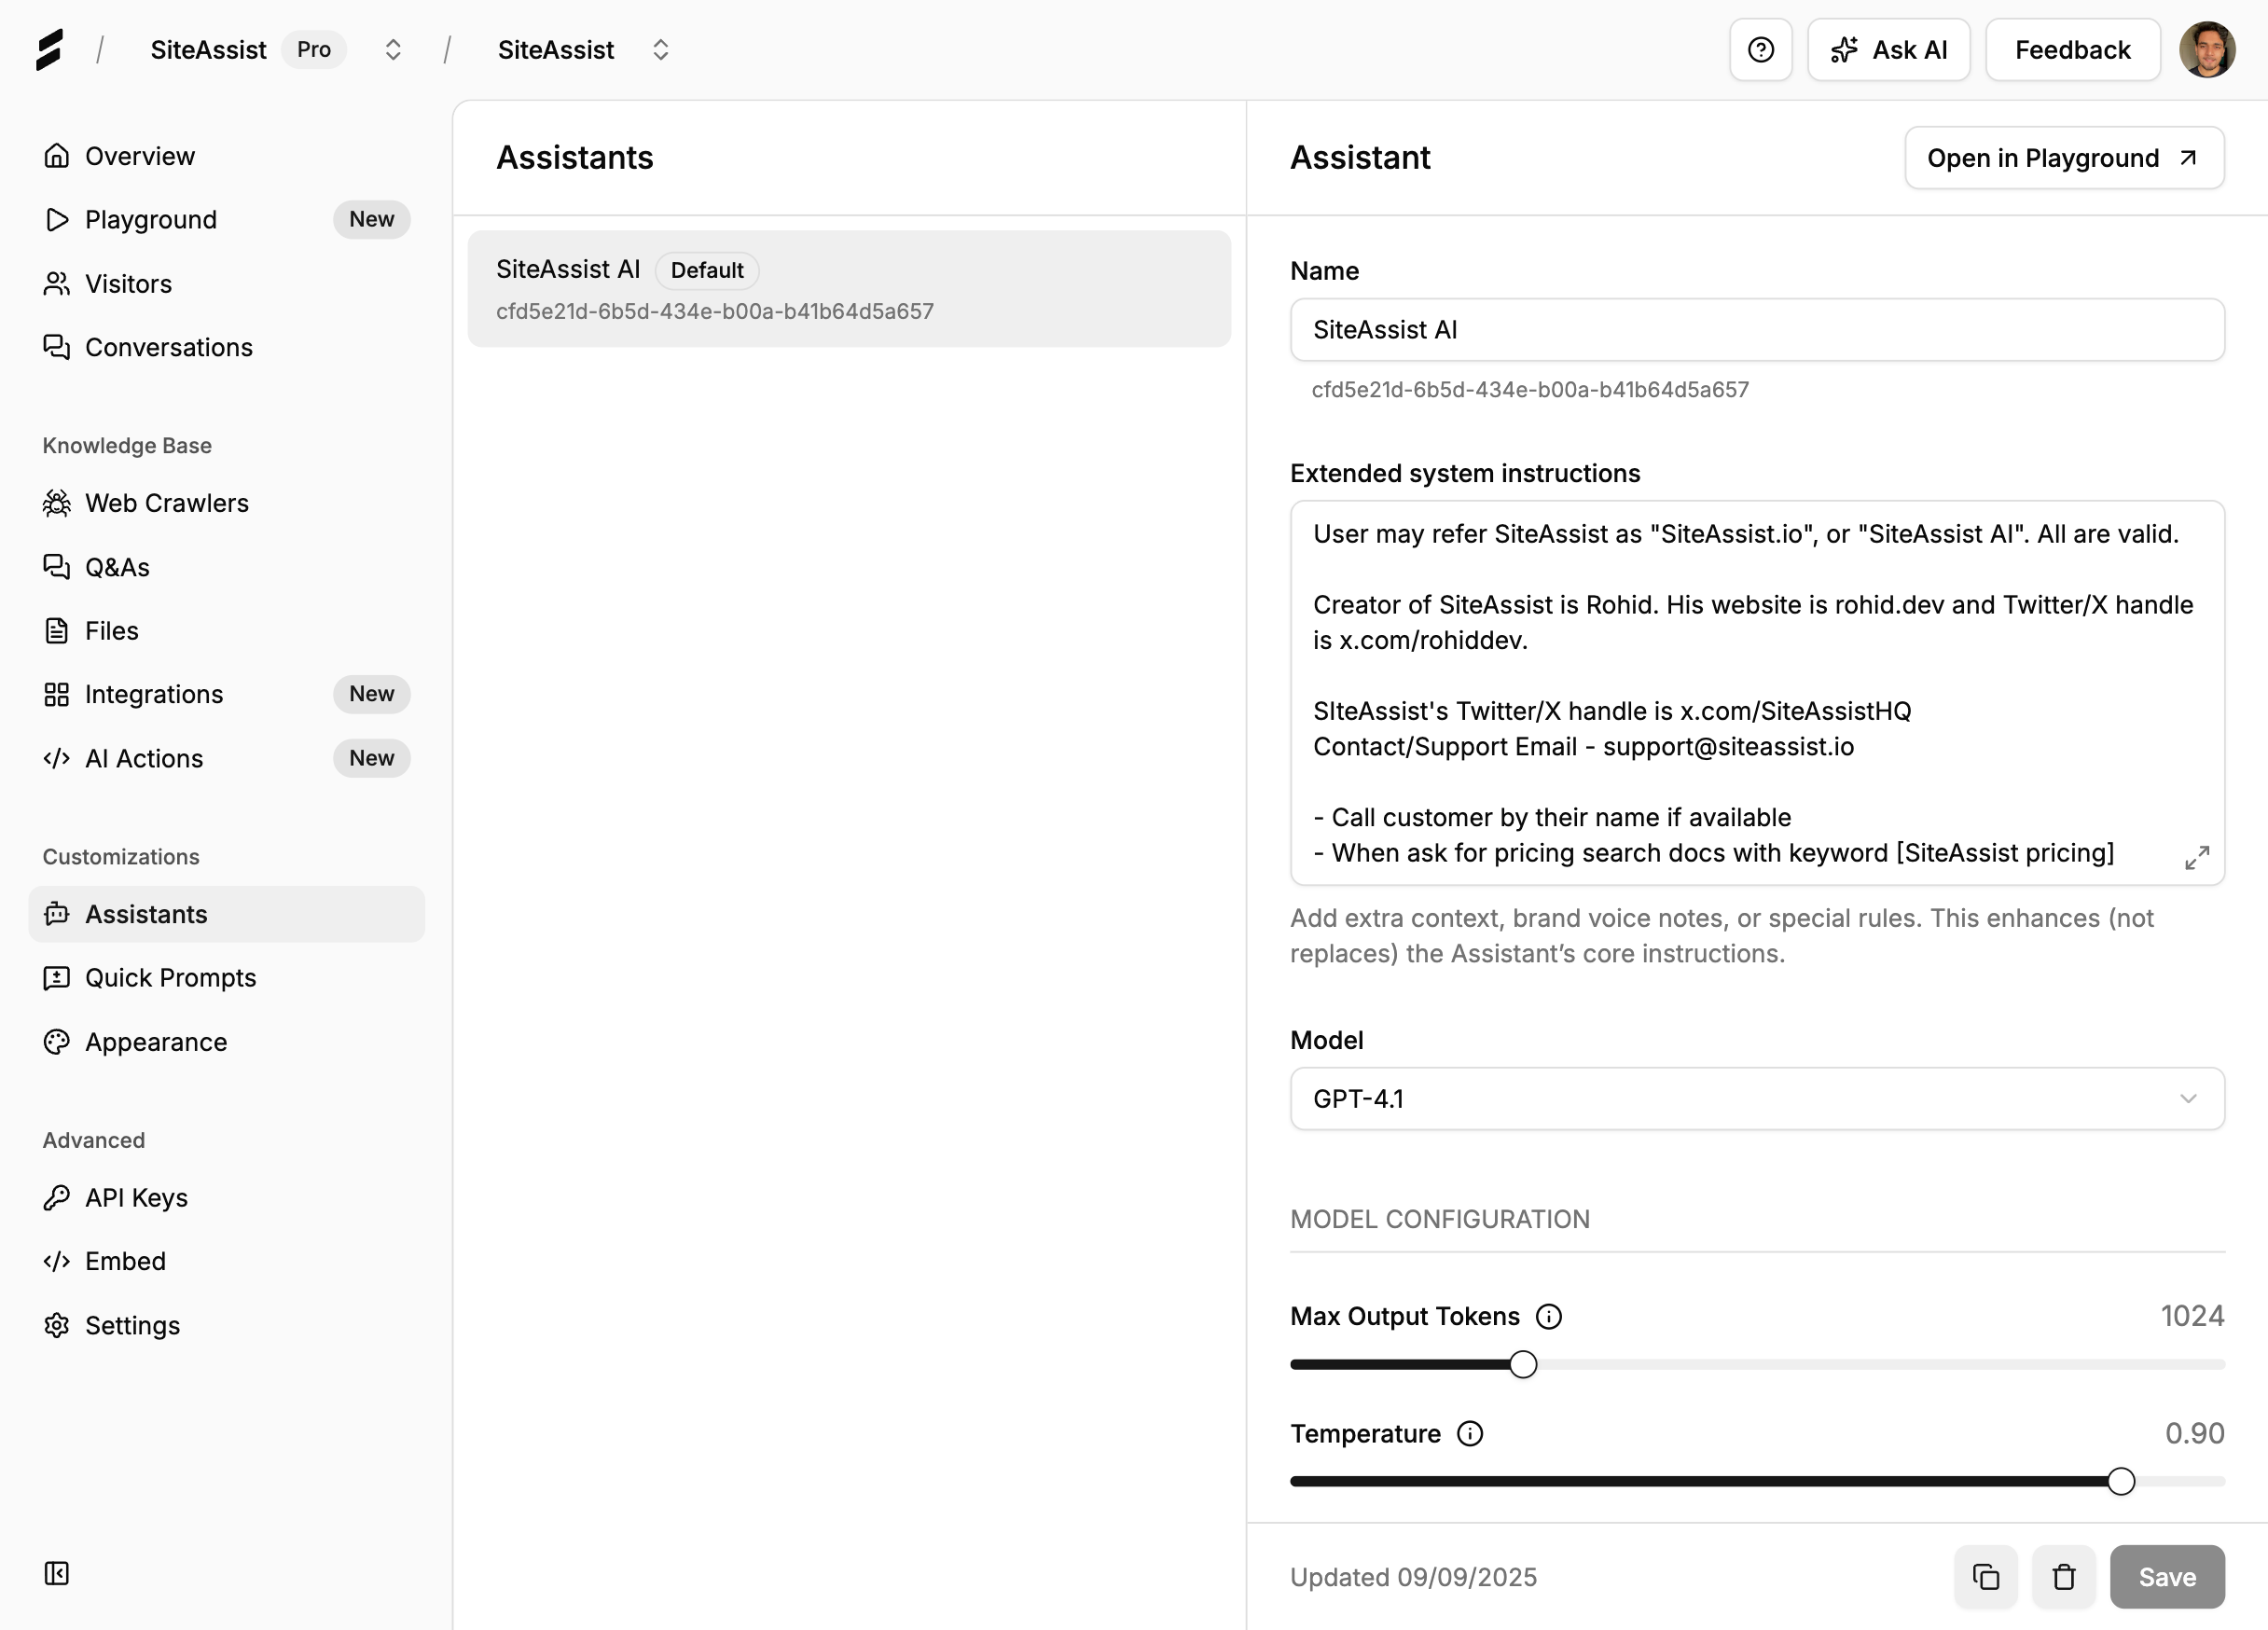 Customize your assistant's personality and appearance
Appearance Settings
Theme Color: Choose a color that matches your brand
- Click the color picker and select your brand color
- Or enter a hex code (e.g.,
#3B82F6)
Position: Where the chat widget appears
- Bottom right (recommended for most sites)
- Bottom left
- Top right
- Top left
Widget Style:
- Bubble (floating chat button)
- Inline (embedded in page)
Advanced Settings (Optional)
Conversation Starters: Add suggested questions to help visitors
Examples:
- "What services do you offer?"
- "How much does it cost?"
- "How do I get started?"
Business Hours: Set when to offer human handoff Email Notifications: Get notified of new conversations
Save your changes when you're done customizing.
Step 4: Test Your AI Assistant (1 minute)
Before going live, let's make sure everything works perfectly.
Use the Built-in Playground
- Look for the "Test Assistant" or "Playground" button
- Click it to open the testing interface
- Try asking questions like:
- "What does your company do?"
- "What are your pricing plans?"
- "How do I contact support?"
The AI should respond with accurate information from your website. If answers seem off, wait for the crawler to finish or add more Q&As manually.
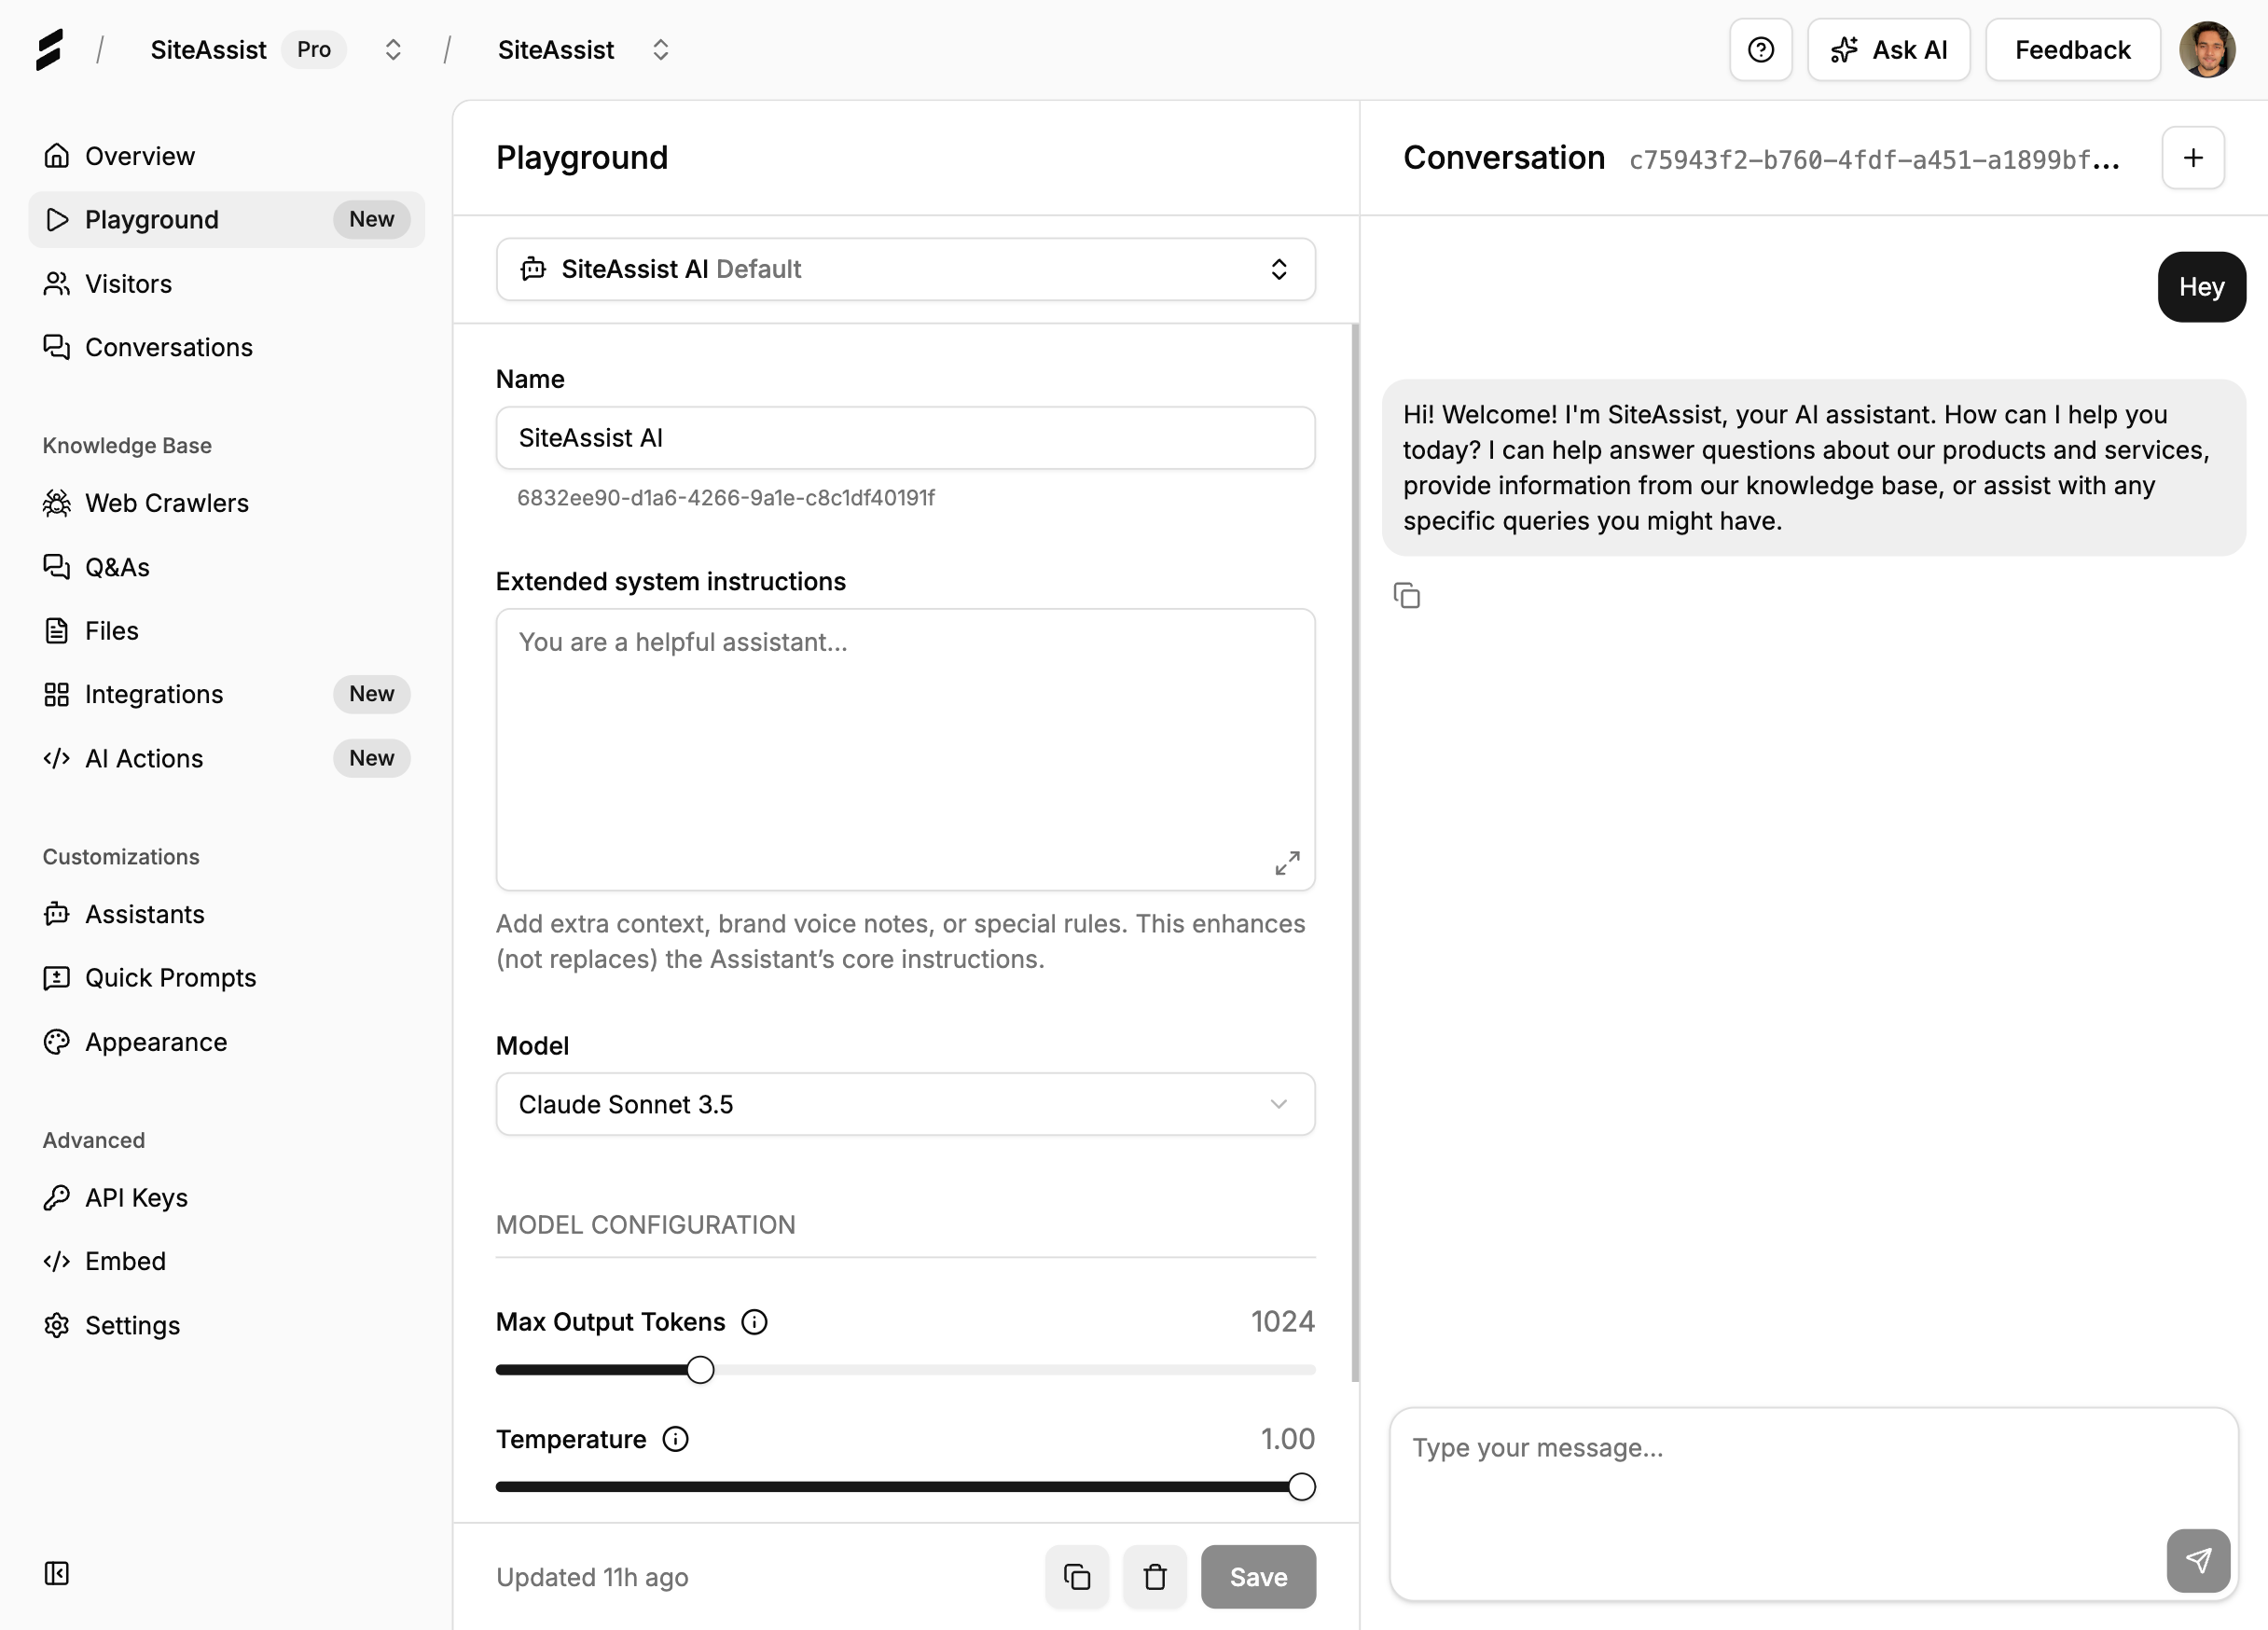 Test your assistant before going live
Add Manual Q&As (Optional)
If your AI doesn't have certain information, you can add it manually:
- Go to "Knowledge Base" → "Q&As"
- Click "Add Q&A"
- Enter a question and answer
- Save and test again
Example:
- Q: "Do you offer a money-back guarantee?"
- A: "Yes! We offer a 30-day money-back guarantee on all plans. If you're not satisfied, just email support@yourcompany.com for a full refund."
Step 5: Embed Your Chatbot (2 minutes)
Now for the final step - adding your chatbot to your website!
Get Your Embed Code
- Click "Assistants" → "Installation" (or look for an "Embed" tab)
- You'll see two installation options:
Option A: Widget Script (Recommended)
<script src="https://widgets.siteassist.io/widget.js"
        data-project-id="your-project-id"
        async>
</script>
Option B: Iframe Embed
<iframe src="https://widgets.siteassist.io/chat/your-project-id"
        style="border: none; position: fixed; bottom: 20px; right: 20px;">
</iframe>- Click "Copy to Clipboard"
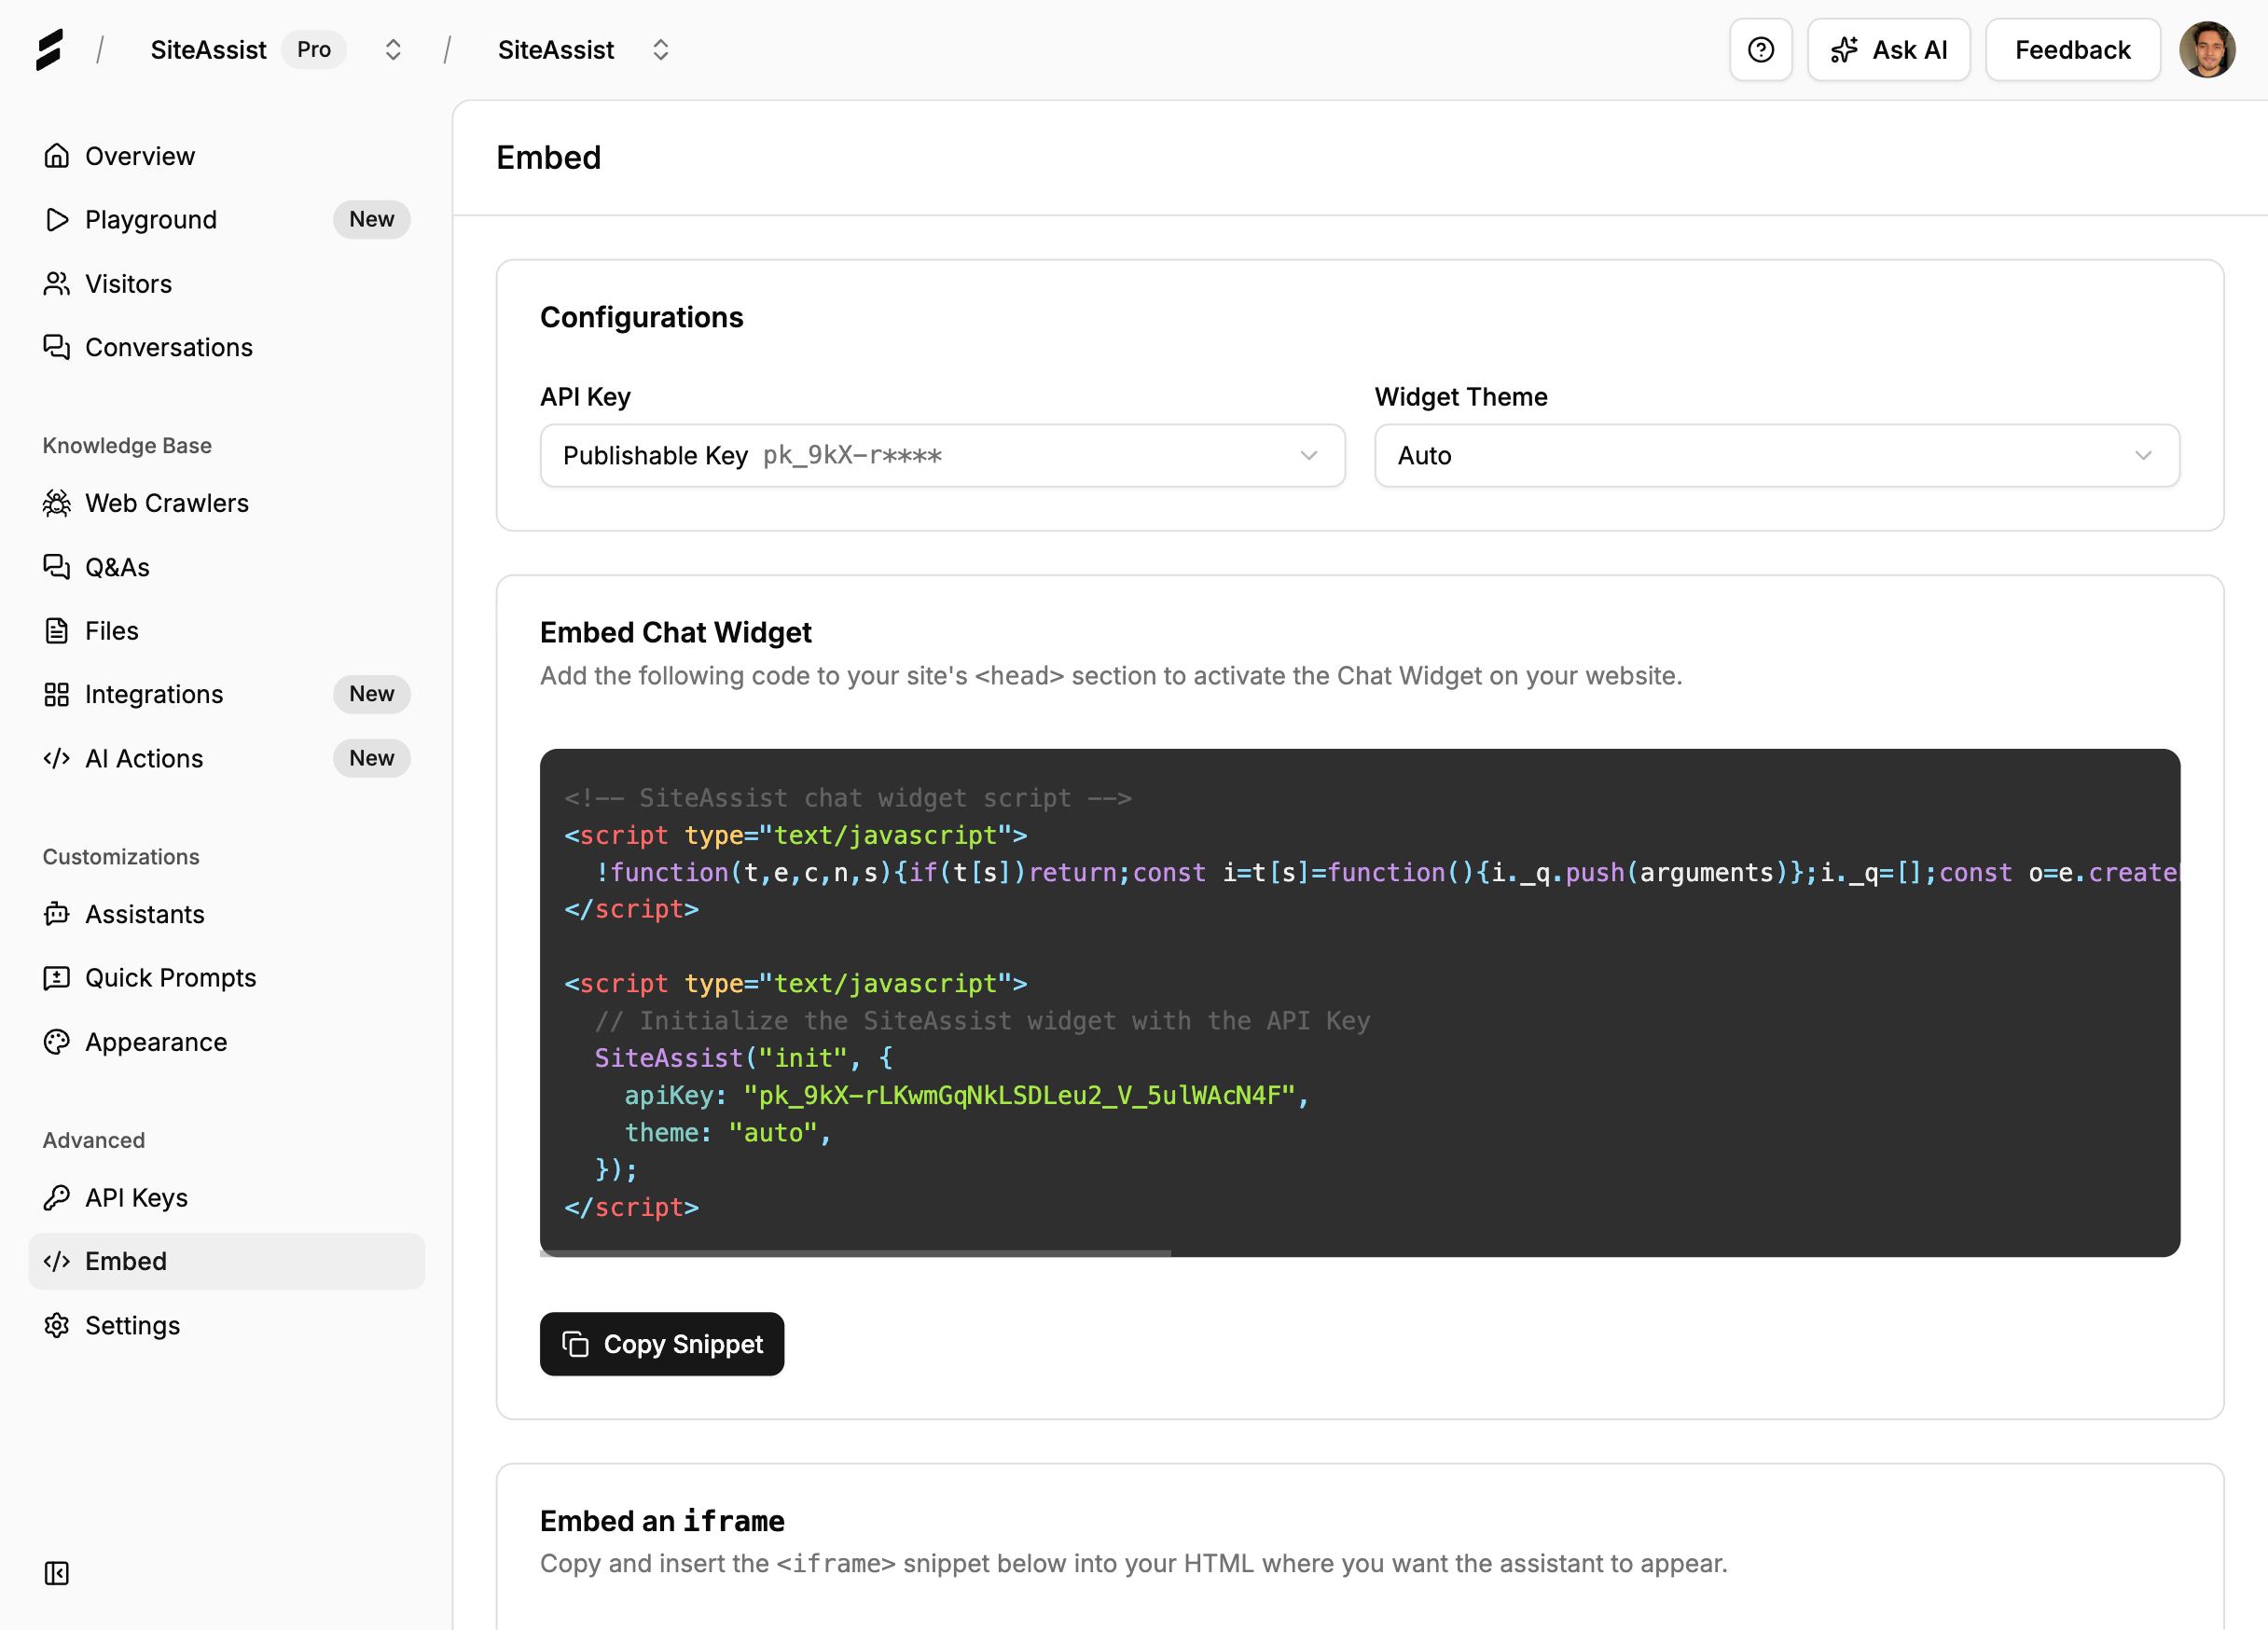 Copy your unique embed code
Add to Your Website
The exact steps depend on your platform:
For WordPress:
- Go to Appearance → Theme Editor
- Edit
footer.phpor use a plugin like "Insert Headers and Footers" - Paste the script before the closing
</body>tag - Save changes
For Shopify:
- Go to Online Store → Themes → Actions → Edit Code
- Open
theme.liquid - Paste the script before
</body> - Save
For Wix:
- Go to Settings → Custom Code
- Click "+ Add Custom Code"
- Paste the script
- Set it to load on "All pages" in the "Body - end"
- Apply
For Webflow:
- Go to Project Settings → Custom Code
- Paste the script in "Footer Code"
- Publish your site
For Custom HTML Sites:
- Open your HTML file
- Paste the script before the closing
</body>tag - Upload the updated file
For React/Next.js:
- Add the script to your
_document.jsor_app.js - Or use a Script component:
<Script
  src="https://widgets.siteassist.io/widget.js"
  data-project-id="your-project-id"
  strategy="lazyOnload"
/>
Verify Installation
- Visit your website in a new browser tab
- You should see the chat widget appear in the bottom corner
- Click it and send a test message
- Congratulations! Your AI chatbot is live! 🎉
 Your AI chatbot is now live and helping visitors!
Troubleshooting Common Issues
The Widget Doesn't Appear
Check these:
- ✅ Did you paste the script before the closing
</body>tag? - ✅ Did you clear your browser cache? (Try incognito mode)
- ✅ Is the script on all pages or just specific ones?
- ✅ Check browser console for JavaScript errors (F12 → Console)
Solution: Re-copy the embed code and make sure your project is active in the dashboard.
The AI Gives Incorrect Answers
Possible causes:
- The crawler hasn't finished yet (check progress in Web Crawlers)
- The information isn't on your website (add manual Q&As)
- The AI needs better prompting (improve your system prompt)
Solution: Wait for crawling to complete, then test again. Add any missing information manually.
The Widget Looks Wrong
Style conflicts:
- Your website's CSS might be affecting the widget
- Check if you have global styles that apply to iframes or all elements
Solution: Contact SiteAssist support - we can help adjust widget styling to match your site perfectly.
Messages Aren't Being Tracked
Check:
- Is your project's publishable key correct?
- Are you testing from a different domain than configured?
Solution: Go to Settings → API Keys and verify your configuration.
Best Practices for Success
Now that your chatbot is live, here are some tips to maximize its effectiveness:
1. Monitor and Improve
Check your conversations regularly:
- Go to "Conversations" in your dashboard
- See what people are asking
- Add Q&As for common questions the AI struggles with
2. Optimize Your System Prompt
Your system prompt is powerful. Good prompts include:
- Your company's tone and personality
- Key products or services to mention
- When to offer human handoff
- Any compliance or legal requirements
Example of a great prompt:
You are Emma, a friendly customer support assistant for GreenTech Solutions,
a solar panel installation company. Be helpful, professional, and enthusiastic
about sustainable energy.

Key priorities:
- Always ask for location (we serve California only)
- Mention our 25-year warranty on all installations
- For pricing questions, encourage booking a free home assessment
- If someone asks about technical installation details, offer to connect them
  with our engineering team

Be concise but thorough. Use emojis sparingly (☀️ 💚 are okay). Never
make promises about specific pricing without an assessment.
3. Add Conversation Starters
Help visitors know what to ask:
- "What areas do you serve?"
- "How much does a typical installation cost?"
- "What's included in your warranty?"
- "How long does installation take?"
4. Set Up AI Actions (Advanced)
Take your chatbot further with AI Actions:
- Send qualified leads to your Slack channel
- Display helpful buttons linking to booking pages
- Trigger webhooks to your CRM
5. Keep Your Content Updated
When you update your website:
- Go to Web Crawlers
- Click "Re-crawl" to refresh your AI's knowledge
- Set up automatic weekly re-crawls (in advanced settings)
Measuring Success
Track your chatbot's performance in the Analytics section:
Key Metrics to Watch:
- Total Conversations: How many visitors are engaging
- Messages per Conversation: Engagement depth
- Resolution Rate: Questions answered successfully
- Popular Topics: What people ask about most
Good benchmarks:
- 5-15% of visitors should engage with your chatbot
- Average 3-7 messages per conversation
- 70-85% resolution rate without human handoff
Scaling Beyond the Free Plan
As your website grows, you might need more:
When to Upgrade:
- You're hitting the 200 messages/month limit
- You have more than 30 pages to crawl
- You want multiple AI assistants
- You need advanced analytics
Paid Plans Include:
- More AI messages (1,000 - 20,000+/month)
- Unlimited page crawling
- Multiple assistants
- Priority support
- Advanced integrations
- Custom branding options
Real Results from Real Businesses
Here's what businesses are seeing after adding their AI chatbot:
"We added the chatbot on Friday, and by Monday we had answered 147 questions without lifting a finger. It's like having a support rep who never sleeps." - Sarah M., SaaS Founder
"Installation took literally 8 minutes. We went from idea to live chatbot in the time it takes to grab coffee." - James T., E-commerce Store Owner
"Our bounce rate dropped by 23% in the first month. Visitors are getting answers immediately instead of leaving." - Maria L., Marketing Director
What Makes This Different from Other Chatbots?
You might be wondering how this compares to other chatbot solutions:
| Feature | SiteAssist | Traditional Chatbots | DIY with ChatGPT |
|---|---|---|---|
| Setup Time | 10 minutes | Hours to days | Complex integration |
| Coding Required | None | Often yes | Significant |
| Learns Your Site | Automatic | Manual training | Manual setup |
| Pricing | Free tier available | $50-500+/month | API costs + dev time |
| Customization | Full control | Limited | Full but complex |
| Maintenance | Automatic updates | Manual updates | Ongoing dev work |
SiteAssist gives you the power of custom AI without the complexity or cost.
Common Questions
Q: Will this slow down my website? A: No! The script loads asynchronously, so it won't affect your page load speed. It's lighter than most analytics scripts.
Q: Can I remove SiteAssist branding? A: Yes! Paid plans include white-label options to remove "Powered by SiteAssist" branding.
Q: What happens when I hit the free tier limit? A: Your chatbot will display a message that you've reached your monthly limit. You can upgrade anytime to continue service.
Q: Can I use this on multiple websites? A: Yes! Create separate projects for each website. The free plan includes 1 project; paid plans include multiple projects.
Q: Is my data secure? A: Absolutely. We're GDPR compliant, encrypt all data, and never train our models on your conversations. Read our privacy policy →
Q: Can I customize the widget design? A: Yes! You can customize colors, position, welcome messages, and more. Advanced CSS customization is available on paid plans.
Q: What if the AI doesn't know something? A: The AI will politely say it doesn't know and can offer to connect the visitor with your human support team. You can also add manual Q&As anytime.
Q: Does this work with languages other than English? A: Yes! The AI supports 100+ languages and will respond in whatever language the visitor uses.
Next Steps
Congratulations! You now have a fully functional AI chatbot on your website. Here's what to do next:
Immediate Actions:
- ✅ Share the news with your team
- ✅ Monitor your first conversations
- ✅ Add any missing Q&As you discover
- ✅ Test the chatbot on mobile devices
This Week:
- Set up email notifications for new conversations
- Review analytics to see engagement patterns
- Refine your system prompt based on real conversations
- Add conversation starters if you haven't already
This Month:
- Explore AI Actions to automate lead capture
- Set up re-crawling to keep content fresh
- Consider upgrading if you're hitting limits
- Collect feedback from your team and customers
Take Your Chatbot Further
Want to unlock more power? Check out these resources:
- How to Train Your AI Assistant to Sound Human - Master the art of great prompts
- Introducing AI Actions - Let your assistant send leads to Slack, trigger webhooks, and more
- Complete Guide to AI Customer Support for SaaS - Advanced strategies
Get Started Right Now
Ready to add an AI chatbot to your website? It takes just 10 minutes:
👉 Start your free account at SiteAssist.io
No credit card required. No coding needed. No catch.
Need help? Our team is here for you! Email support@siteassist.io or use the chatbot on our website (yes, we use SiteAssist too! 😊)
Have you added your AI chatbot yet? Share your experience or questions in the comments below!